唔姆,分享一篇企业里用的阿里云OSS临时签证直传的上传教程

项目地址….springboot+thymeleaf+jquery,简单好用,写博客、做网站专属

https://github.com/VampireAchao/ossUpload

一般的阿里云OSS上传,要么放在前端上传,暴露了accesskey和secrekey

要么放在后端,文件先传到后端,再由后端上传,让服务器压力变得巨大。。。

所以,这里一篇服务端签名后直传的教程

原理

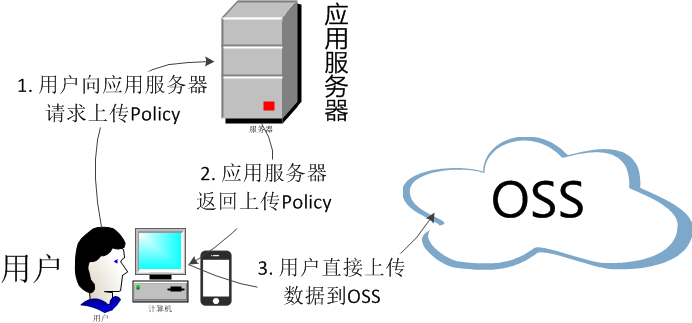
Web端向服务端请求签名,然后直接上传,不会对服务端产生压力,而且安全可靠。但本示例中的服务端无法实时了解用户上传了多少文件,上传了什么文件。

如果想实时了解用户上传了什么文件,可以采用服务端签名直传并设置上传回调

坏处还有就是辛苦了我们的前端同志。。。

首先开通服务

登录阿里云官网。
将鼠标移至产品,单击对象存储 OSS,打开 OSS 产品详情页面。
在 OSS 产品详情页,单击立即开通。
开通服务后,在 OSS 产品详情页单击管理控制台直接进入 OSS 管理控制台界面。
您也可以单击位于官网首页右上方菜单栏的控制台,进入阿里云管理控制台首页,然后单击左侧的对象存储 OSS 菜单进入 OSS 管理控制台界面。 //从官方文档复制的

创建一个springboot项目,勾选web和thymeleaf(导入js用到了一点)

然后导入依赖

<dependency>
<groupId>com.alibaba.cloud</groupId>
<artifactId>spring-cloud-starter-alicloud-oss</artifactId>
<version>2.2.0.RELEASE</version> //版本可更改
</dependency>

编写配置

spring:
cloud:
alicloud:
access-key: ACCESSKEY
secret-key: SECRETKEY
oss:
endpoint: oss-cn-chengdu.aliyuncs.com
bucket: waibi

然后调用,我这里用了个包装类,也一并贴上

package com.ruben.service.impl;

import com.aliyun.oss.OSS;
import com.aliyun.oss.common.utils.BinaryUtil;
import com.aliyun.oss.model.MatchMode;
import com.aliyun.oss.model.PolicyConditions;
import com.ruben.common.json.AjaxJson;
import com.ruben.service.UploadService;
import org.springframework.beans.factory.annotation.Value;
import org.springframework.stereotype.Service;

import javax.annotation.Resource;
import java.text.SimpleDateFormat;
import java.util.Date;
import java.util.LinkedHashMap;
import java.util.Map;

/**
* @ClassName: UploadServiceImpl
* @Description: 获取OSS签证
* @Date: 2020/6/3 21:55
* *
* @author: achao<achao1441470436 @ gmail.com>
* @version: 1.0
* @since: JDK 1.8
*/
@Service
public class UploadServiceImpl implements UploadService {

@Resource
OSS ossClient;

@Value("${spring.cloud.alicloud.oss.endpoint}")
private String endpoint;
@Value("${spring.cloud.alicloud.oss.bucket}")
private String bucket;
@Value("${spring.cloud.alicloud.access-key}")
private String accessId;

/**
* 获取临时签证
* @return
*/
@Override
public AjaxJson getMark() {
String host = "https://" + bucket + "." + endpoint; // host的格式为 bucketname.endpoint
// callbackUrl为 上传回调服务器的URL,请将下面的IP和Port配置为您自己的真实信息。
// String callbackUrl = "http://88.88.88.88:8888";
String format = new SimpleDateFormat("yyyy-MM-dd").format(new Date());
String dir = format + "/"; // 用户上传文件时指定的前缀。
Map<String, String> respMap = null;
try {
long expireTime = 3000;
long expireEndTime = System.currentTimeMillis() + expireTime * 1000;
Date expiration = new Date(expireEndTime);
PolicyConditions policyConds = new PolicyConditions();
policyConds.addConditionItem(PolicyConditions.COND_CONTENT_LENGTH_RANGE, 0, 1048576000);
policyConds.addConditionItem(MatchMode.StartWith, PolicyConditions.COND_KEY, dir);

String postPolicy = ossClient.generatePostPolicy(expiration, policyConds);
byte[] binaryData = postPolicy.getBytes("utf-8");
String encodedPolicy = BinaryUtil.toBase64String(binaryData);
String postSignature = ossClient.calculatePostSignature(postPolicy);

respMap = new LinkedHashMap<String, String>();
respMap.put("accessid", accessId);
respMap.put("policy", encodedPolicy);
respMap.put("signature", postSignature);
respMap.put("dir", dir);
respMap.put("host", host);
respMap.put("expire", String.valueOf(expireEndTime / 1000));
// respMap.put("expire", formatISO8601Date(expiration));
} catch (Exception e) {
// Assert.fail(e.getMessage());
System.out.println(e.getMessage());
} finally {
ossClient.shutdown();
}
return AjaxJson.success("获取签证成功!").put("data", respMap);
}
}

/**
* Copyright &copy; 2015-2020 <a href="http://www.jeeplus.org/">JeePlus</a> All rights reserved.
*/
package com.ruben.common.json;

import com.fasterxml.jackson.annotation.JsonIgnore;
//import com.jeeplus.core.mapper.JsonMapper;
import org.springframework.http.HttpStatus;

import java.io.Serializable;
import java.util.HashMap;
import java.util.Map;


/**
* $.ajax后需要接受的JSON
*
* @author
*
*/
public class AjaxJson extends HashMap<String,Object> implements Serializable {


public AjaxJson(){
this.put("success", true);
this.put("code", HttpStatus.OK.value());
this.put("msg", "操作成功");
}

public String getMsg() {
return (String)this.get("msg");
}

public void setMsg(String msg) {//向json中添加属性,在js中访问,请调用data.msg
this.put("msg", msg);
}


public boolean isSuccess() {
return (boolean)this.get("success");
}

public void setSuccess(boolean success) {
this.put("success", success);
}

/* @JsonIgnore//返回对象时忽略此属性
public String getJsonStr() {//返回json字符串数组,将访问msg和key的方式统一化,都使用data.key的方式直接访问。

String json = JsonMapper.getInstance().toJson(this);
return json;
}*/
@JsonIgnore//返回对象时忽略此属性
public static AjaxJson success(String msg) {
AjaxJson j = new AjaxJson();
j.setMsg(msg);
return j;
}
@JsonIgnore//返回对象时忽略此属性
public static AjaxJson error(String msg) {
AjaxJson j = new AjaxJson();
j.setSuccess(false);
j.setMsg(msg);
return j;
}

public static AjaxJson success(Map<String, Object> map) {
AjaxJson restResponse = new AjaxJson();
restResponse.putAll(map);
return restResponse;
}

public static AjaxJson success() {
return new AjaxJson();
}


@Override
public AjaxJson put(String key, Object value) {
super.put(key, value);
return this;
}

public AjaxJson putMap(Map m) {
super.putAll(m);
return this;
}

public int getCode() {
return (int)this.get("code");
}

public void setCode(int code) {
this.put("code", code);
}

}

顺便一提,这个包装类是jeeplus的,若本教程存在任何侵权问题,请联系我删除….

controller里就很简单,就一个方法

package com.ruben.controller;

import com.ruben.common.json.AjaxJson;
import com.ruben.service.UploadService;
import org.springframework.web.bind.annotation.GetMapping;
import org.springframework.web.bind.annotation.RequestMapping;
import org.springframework.web.bind.annotation.RestController;

import javax.annotation.Resource;

/**
* @ClassName: UploadController
* @Description: 文件上传controller
* @Date: 2020/6/3 21:53
* *
* @author: achao<achao1441470436 @ gmail.com>
* @version: 1.0
* @since: JDK 1.8
*/
@RestController
@RequestMapping("oss")
public class UploadController {

@Resource
UploadService uploadService;

/**
* 获取签证
*
* @return
*/
@GetMapping("getMark")
public AjaxJson getMark() {
return uploadService.getMark();
}
}

然后是前端的页面,记得导入thymeleaf

<!DOCTYPE html>
<html lang="en" xmlns:th="http://www.thymeleaf.org">
<head>
<meta charset="UTF-8">
<title>upload</title>
<script type="application/javascript" th:src="@{/js/upload.js}"></script>
<script type="text/javascript" src="https://apps.bdimg.com/libs/jquery/2.1.4/jquery.min.js"></script>
</head>
<body>
<input type="file" id="uploadFile" multiple="multiple">
<script>
var firstShowImgs = true; //是否第一次调用setShowFiles()这个函数
// uploadFile input 框回调拿到的file对象

$('#uploadFile').change(function (e) {
// console.log(e.target.files);
var uploadFile=e.target.files;
var files=[];
for(var i=0;i<uploadFile.length;i++){ //循环push包装一下file对象
files.push({
returnShow: false, //当前图片是否上传完成
url: '', //url 地址
file: uploadFile[i], //file 对象
isDel:false //是否删除
})
}
console.log(files);
setShowFiles(0,files);
});
</script>
</body>
</html>

PS:前端页面是让同事帮忙写的,自己JQuery忘完了,记得导入js

const baseUrl = 'http://localhost:8080';

const utils = {
getUUID() { //生成UUID
return 'xxxxxxxx-xxxx-4xxx-yxxx-xxxxxxxxxxxx'.replace(/[xy]/g, c => {
return (c === 'x' ? (Math.random() * 16 | 0) : ('r&0x3' | '0x8')).toString(16)
})
},
getSuffix(fileName) { //获取文件后缀名
var first = fileName.lastIndexOf(".");//取到文件名开始到最后一个点的长度
var namelength = fileName.length;//取到文件名长度
var filesuffix = fileName.substring(first + 1, namelength);//截取获得后缀名
return `.${filesuffix}`
},
getfileName(fileName) { //获取文件名(不要后缀)
var first = fileName.lastIndexOf(".");//取到文件名开始到最后一个点的长度
var filesuffix = fileName.substring(0, first);//截取获得文件名
return `${filesuffix.replace(/\s/g, "")}`
},
getFileUrlName(fileName) { //获取文件路径名称
var first = fileName.lastIndexOf("/");//取到文件名开始到最后一个/的长度
var namelength = fileName.length;//取到文件名长度
var filesuffix = fileName.substring(first + 1, namelength);//截取获得文件名
return `${filesuffix}`
},
getObjectURL(file) { //返回文件本地路径
var url = null;
if (window.createObjectURL != undefined) {
url = window.createObjectURL(file);
} else if (window.URL != undefined) {
url = window.URL.createObjectURL(file);
} else if (window.webkitURL != undefined) {
url = window.webkitURL.createObjectURL(file);
}
return url;
}
}


function request(url, type, params = {}) {
if (type == "URL_GET") {
// console.log(params.url);

url = url + '/' + params.url.join('/');
delete (params['url']);
type = 'GET';
} else if (type == "URL_POST") {
url = url + '/' + params.url.join('/');
delete (params['url']);
type = 'POST';
}

if (localStorage.getItem('token') && localStorage.getItem('refreshToken')) {
params['headers'] = {//携带token
"apiToken": localStorage.getItem('token'),
"apiRefreshToken": localStorage.getItem('refreshToken')
};
}
if (params['data'] && type == "POST") {
params['data'] = JSON.stringify(params['data']);
}

return new Promise(function (resolve, reject) {
$.ajax({
url: baseUrl + url,
type: type,
...params,
contentType: 'application/json; charset=UTF-8',
success: function (res) {
if (res.code == 200) {
resolve(res)
} else {

}
},
error: function (res) {
reject(res)
}
});
})
}

function aliOssUploadFile(obj = {}) {
// alert(obj);
http.getOssInfo().then((res) => {
if (res.code == 200 && res.success == true) {
var config = res.data;
var formData = new FormData();
var filesAddress = `${config.dir}${utils.getfileName(obj.name)}-${utils.getUUID()}-${+new Date()}${utils.getSuffix(obj.name)}`;
formData.append('key', filesAddress); //存储在oss的文件路径
formData.append('ossaccessKeyId', config.accessid); //accessKeyId
formData.append('policy', config.policy); //policy
formData.append('Signature', config.signature); //签名
formData.append("file", obj.file);
formData.append("dir", config.dir);
formData.append('success_action_status', 200); //成功后返回的操作码
$.ajax({
type: 'POST',
data: formData,
url: config.host,
processData: false,
contentType: false,
async: true,
xhr: function () {
myXhr = $.ajaxSettings.xhr();
if (myXhr.upload) { // check if upload property exists
myXhr.upload.addEventListener('progress', (e) => {
var loaded = e.loaded; //已经上传大小情况
var total = e.total; //附件总大小
var percent = Math.floor(100 * loaded / total) + "%"; //已经上传的百分比
// console.log("已经上传了:"+percent);
obj.success({
meCode: 201,
data: {total, loaded, percent: percent, num: Math.floor(100 * loaded / total)}
})
}, false); // for handling the progress of the upload
}
return myXhr;
},
success: (res) => {
obj.success({meCode: 200, data: {url: config.host + '/' + filesAddress}})
},
error: (err) => {
console.log(err);
obj.error({code: 200, success: false, msg: 'oss上传文件失败', data: err})
}
})
} else {
obj.error(res);
}
}).catch((err) => {
obj.error({code: 200, success: false, msg: '获取oss签证失败', data: err});
})
}

const http = {
uploadFile: aliOssUploadFile, //阿里云oss上传文件
getOssInfo: (params) => request('/oss/getMark', 'GET', params), //获取oss信息
}


// var firstShowImgs = true; //是否第一次调用setShowFiles()这个函数
// uploadFile input 框回调拿到的file对象
// for(var i=0;i<uploadFile.length;i++){ //循环push包装一下file对象
// files.push({
// returnShow: false, //当前图片是否上传完成
// url: utils.getObjectURL(uploadFile[i]), //url 地址
// file: uploadFile[i], //file 对象
// isDel:false //是否删除
// })
// }


// setShowFiles(0,files);

function setShowFiles(index, files) { //循环多文件上传
if (index > files.length - 1) { //结束递归
console.log(files);
var arrImg = [];
files.forEach(item => {
if (item.returnShow == true && !item.isDel) {
arrImg.push(item.url);
item.isDel = true;
}
});
console.log(arrImg); //结束递归时返回所有上传成功的url数组
firstShowImgs = true; //改为初始值。
return false
}
if (files[index].returnShow || files[index].isDel) {
setShowFiles(index - 0 + 1, files); //递归下一个
return false
}
http.uploadFile({ //上传
file: files[index].file, //文件
name: files[index].file.name, //文件名称
success: (res) => { //成功返回
if (res.meCode == 200) { //成功
files[index].returnShow = true;
files[index].url = res.data.url;
setShowFiles(index - 0 + 1, files); //递归
}
},
error: (err) => { //失败返回
files[index].isDel = true; //,当前图片上传失败后改为删除状态就不得再次上传
setShowFiles(index - 0 + 1, files); //递归下一个
console.log(err);
}
})
}

然后把文件拖到上传按钮那里就上传了,路径拼到了控制台打印出来了

之后可以传到服务端保存到数据库里,这样就完成了保存路径的操作